
How to target lower belly fat without doing 200 crunches is the question I asked after six months of gut-filling Instagram challenges.
I kept the abs work. I changed everything else. This guide shows what worked for me, the setup that made sensible training stick, and a $300 to $700 budget range to get started or refresh.
My approach skips endless crunches and focuses on the training and environment that actually move the needle.
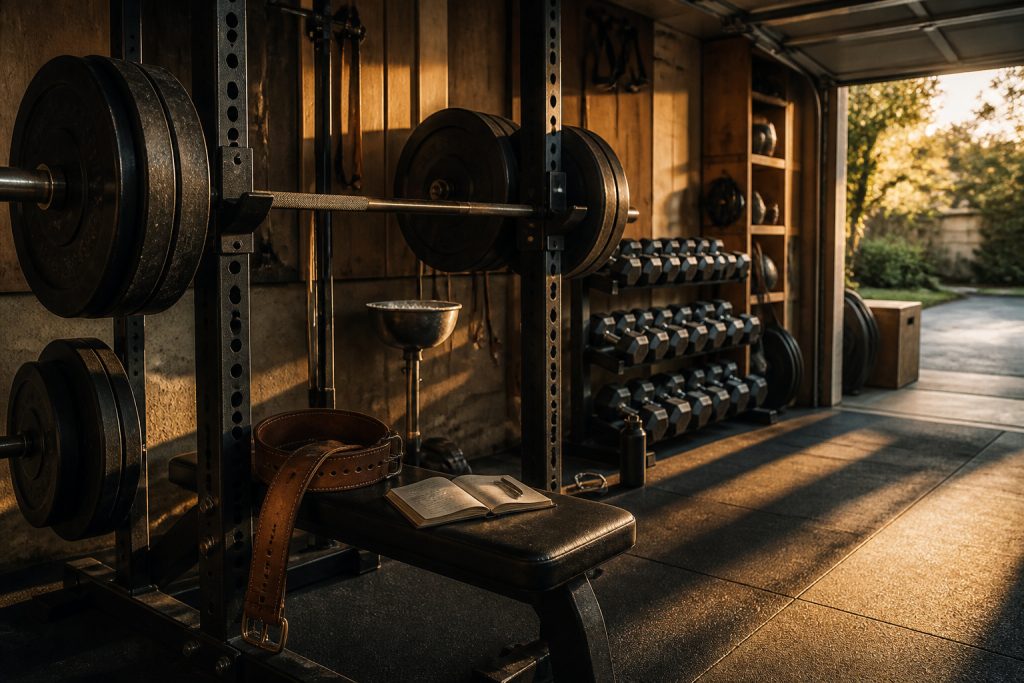
I train in a garage-gym vibe, strength-first with built-in conditioning and mobility corners.
The setup below suits apartment lifters who need compact gear and garage owners with room to expand.
Expect to spend around $300 to $700 from scratch, or under $200 to refresh key pieces.
I've noticed adjustable dumbbells and compact racks are what people buy first when space is tight.
1. Start with the Foundation: Flooring and Rack Setup

The floor and rack decide everything. I started with thin carpet and learned the hard way. A stable surface protects the concrete and keeps plates quiet.
Pick heavy duty rubber gym flooring tiles 24 x 24 in 1/2 in thick for shock absorption and grip.
Pair that with a foldable squat rack with pull-up bar so you get a full strength zone without a permanent anchor.
Leave 3 feet of clearance behind the rack and 2 feet on each side for plate loading and bar path.
Most people push racks to the wall to save space. That kills safe pull-ups and loading.
Do this instead: center the rack slightly off wall and orient bench for flat and incline with a clear bar path.
2. Layer in Free Weights and Storage

Free weights are the workhorses for hormone-friendly fat loss and strength carryover.
Start with an adjustable dumbbell pair 5 to 52 lb for space efficiency and an Olympic barbell 45 lb 7 ft for heavy compound work.
Add a pair of 45 lb bumper plates or a small plate set so you can squat and deadlift safely.
Organize with a compact dumbbell rack or plate tree to keep the floor clear.
My trick was stacking weights by frequency. Keep the most-used plates and dumbbell increments within arm reach.
Mistake: buying a dozen single fixed dumbbells that clutter. Buy adjustable or a small matched set to keep your floor usable and routines consistent.
3. Add Conditioning and Mobility Tools

Crunches alone don't burn the visceral fat that sits low on your belly. Conditioning and mobility tools bridge strength work and steady calorie burn.
A kettlebell 35 lb or 44 lb is perfect for swings and carries that tax the posterior chain and core.
Add a resistance band set with handles for assisted pull-ups and RPE-tuned activation.
Finish with a 36 in foam roller and mobility strap to speed recovery and maintain movement quality.
Place the conditioning corner within sight of the rack so circuits flow: 6 to 8 feet from the rack to allow swings and sled work if you add it later.
People skip mobility. Then they stall. Small daily mobility saves training weeks.
4. Finish with Lighting, Mirrors, and Atmosphere

Lighting and a mirror keep workouts honest. A full-length wall mirror 48 by 36 in helps dial bar path and posture.
Install bright LED shop light 4 ft 5000K overhead for crisp visibility during heavy sets.
Add small brass hooks and a chalk bowl near the rack to reduce clutter and maintain flow.
Visual principle: keep heavier, darker equipment anchored; lighter accessories live on the walls to make space feel larger.
Don't overdo mirrors or neon. Too many reflections make small spaces claustrophobic.
Place the mirror 4 to 6 feet from the rack so you can see form without crowding your movement space.
Common Setup Mistakes to Avoid
Mistake: Pushing the rack flat against the wall to save space
Why it doesn't work: No room for pull-ups, bar path, or safe plate loading.
Do this instead: Leave 3 feet behind the rack. Foldable squat rack with pull-up bar around $250 to $600
Mistake: Buying a full fixed dumbbell set first
Why it doesn't work: Takes floor space and costs more up front.
Do this instead: Start with an Adjustable dumbbell pair 5 to 52 lb around $300 to $450
Mistake: Skipping conditioning tools because you "do cardio outside"
Why it doesn't work: You lose short, intense sessions that burn belly fat and improve conditioning.
Do this instead: Add a kettlebell 35 lb cast iron approx $40 to $80
What You'll Need for This Setup
Foundation Pieces
Heavy duty rubber gym flooring tiles 24 by 24 in 1/2 in around $1.50 to $3.50 per tile
Foldable squat rack with pull-up bar around $250 to $600
Flat bench adjustable 500 lb capacity around $80 to $200
Strength & Free Weights
Adjustable dumbbell pair 5 to 52 lb around $300 to $450
Olympic barbell 45 lb 7 ft stainless steel approx $120 to $250
45 lb bumper plate pair around $80 to $200
Conditioning & Mobility
kettlebell 35 lb cast iron approx $40 to $80
Resistance band set with handles approx $15 to $35
Finishing Touches
Full length wall mirror 48 by 36 in around $70 to $150
LED shop light 4 ft 5000K approx $25 to $80
Chalk bowl with scoop approx $10 to $25
Budget Swaps
Used Olympic barbell 45 lb 7 ft similar on Facebook Marketplace for less often $60 to $150
[Garage sale bumper plates similar on Craigslist for less] (https://www.amazon.com/s?k=used+bumper+plates+45+lb&tag=MovementClarity-100) around $40 to $120
Shopping Guide for This Setup
Buy seasonally: Shop Black Friday or end-of-summer clearance for racks and dumbbells. Adjustable dumbbell pair 5 to 52 lb often drops then.
Used gear hack: Mix a used Olympic barbell with new plates to save $100+. Olympic barbell 45 lb 7 ft stainless steel
2025 trend tip: Compact functional racks and app-linked programming are mainstream. Pick gear compatible with digital coaching. Foldable squat rack with pull-up bar
Splurge vs save: Splurge on the barbell for feel and knurling. Save on plates by buying used or basic bumpers. 45 lb bumper plate pair approx $80 to $200
Conclusion
Start with one high-impact piece. For most people that was a solid barbell and a small plate set. Those two items changed my training and finally shifted lower belly fat when paired with calories and conditioning.
Rule to train by: build progressive overload, add short conditioning circuits, and keep recovery consistent.
What one piece would you add to your space first?

